MooseFS on Proxmox
This guide provides a step-by-step instruction for installing MooseFS on Proxmox machines, allowing it to be set up as a storage provider for Proxmox in a multi-node cluster.
1. Add MooseFS repository to all Proxmox nodes
Proxmox 8:
curl https://repository.moosefs.com/moosefs.key | gpg -o /etc/apt/keyrings/moosefs.gpg --dearmor

echo "deb [arch=amd64 signed-by=/etc/apt/keyrings/moosefs.gpg] http://repository.moosefs.com/moosefs-4/apt/debian/bookworm bookworm main" > /etc/apt/sources.list.d/moosefs.list
Proxmox 7:
curl https://repository.moosefs.com/moosefs.key | gpg -o /etc/apt/keyrings/moosefs.gpg --dearmor

echo "deb [arch=amd64 signed-by=/etc/apt/keyrings/moosefs.gpg] http://repository.moosefs.com/moosefs-4/apt/debian/bullseye bullseye main" > /etc/apt/sources.list.d/moosefs.list
2. Install MooseFS Master Server package on selected Proxmox nodes
apt install moosefs-pro-master
3. Make the domain name of the Master Server resolvable on all Proxmox nodes
The domain name of the Master Server (mfsmaster or mfsmaster.vm.lan in this example) has to be resolvable on all Proxmox nodes, either via DNS, or via /etc/hosts file. If you decide to use the hosts file, make sure that it is consistent across all the nodes.
For example:
192.168.0.11		mfsmaster.vm.lan	mfsmaster
192.168.0.12		mfsmaster.vm.lan	mfsmaster


192.168.0.11		pve1.vm.lan		pve1
192.168.0.12		pve2.vm.lan		pve2
192.168.0.13		pve3.vm.lan		pve3
192.168.0.14		pve4.vm.lan		pve4
192.168.0.15		pve5.vm.lan		pve5

127.0.0.1 localhost.localdomain localhost
4. Enable and start MooseFS Master Server
systemctl enable --now moosefs-pro-master
5. Install Chunk Servers on all Proxmox nodes
A Chunk Server must be present on all Proxmox nodes that will be used as data storage providers. Install moosefs-pro-chunkserver package on these.
6. Prepare disks for Chunk Servers
Do not mount the disks for storage in Proxmox. Instead, prepare them for Chunk Servers. For each storage provider node:
- Format all disks designated as Chunk Server disks with a file system of your choice. We recommend using XFS for HDD and EXT4 for SSD/NVMe disks.
- Add them to
/etc/fstab - Reload systemd:
systemctl daemon-reload
- Mount all fstab mountpoint:
mount -a
- Change the ownership of Chunk Server mountpoints to
mfs:mfs, for example:
chown -R mfs:mfs /mnt/chunks*
- Add the mountpoints to
/etc/mfs/mfshdd.cfgfile. For example:
# cat /etc/mfs/mfshdd.cfg
/mnt/chunks1
/mnt/chunks2
/mnt/chunks3
/mnt/chunks4
7. Enable and start the Chunk Server service
systemctl enable --now moosefs-pro-chunkserver
8. Install MooseFS Client on each Proxmox node.
- Install package
apt install moosefs-pro-client
- Configure a
systemdunit for automatic mounting:
The unit name has to match the mount path. In this example, the mounting path is /mnt/moosefs, so the unit file should be named: mnt-moosefs.mount. If you want to use a different path, adjust this name accordingly.
Fill the mnt-moosefs.mount unit file with the following content and place it in /etc/systemd/system location:
# cat /etc/systemd/system/mnt-moosefs.mount
[Unit]
Description=MooseFS FUSE mount
ConditionPathExists=/mnt/moosefs

[Mount]
What=mfsmaster.vm.lan:/
Where=/mnt/moosefs
Type=moosefs
Options=nonempty,mfsdelayedinit

[Install]
WantedBy=multi-user.target
- Enable mounting at system startup
systemctl enable --now mnt-moosefs.mount
9. Add the MooseFS to the Proxmox cluster
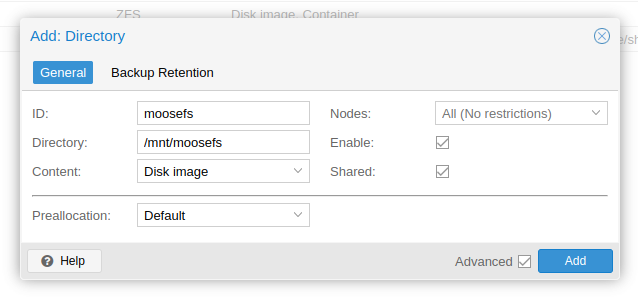
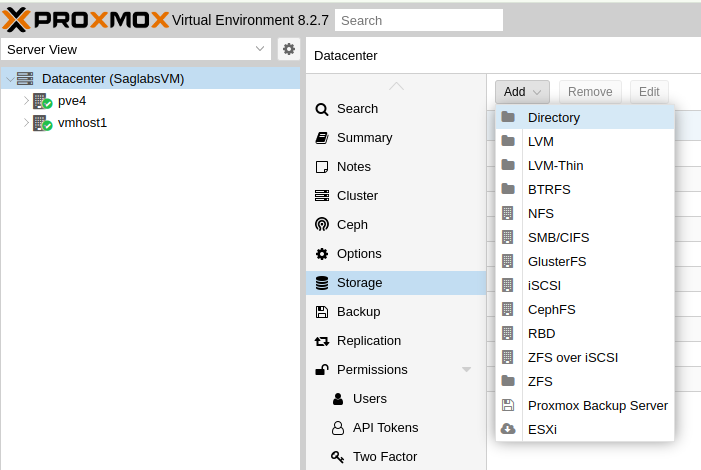
- In the Proxmox GUI, go to the Datacenter view
- Select Storage and choose Directory
- Then in Add: Directory window, complete the parameters:
- ID:
moosefs - Directory:
/mnt/moosefs - Content: select based on your needs
- Enable: ✅
- Shared: ✅